ConfigMgr: Logging the Time Taken to Run a Task Sequence Using PowerShell & Custom TS Vars
If you want a real-world example of reading and writing SCCM custom task sequence variables in a task sequence then you will want to read this. (Part 2 of 2)
If you haven’t already seen Part 1 of this two part post then take a quick look now.
I read the following on technet:
Task Sequence variables can be read and written by using the Microsoft.SMS.TSEnvironment COM object while the task sequence is running.
The article then went on how to achieve this using VBScript.
So it was a simple matter of converting this to PowerShell: using their example, the ‘converted’ PowerShell code looks like this:
$tsenv = New-Object -ComObject Microsoft.SMS.TSEnvironment

<#You can query the environment to get an existing variable.#>
$logPath = $tsenv.value("_SMSTSLogPath")

<#You can also set a variable in the OSD environment.#>
$tsenv.Value("MyCustomVariable") = $SomeVar
Further to the above example, we could then use PowerShell to retrieve the custom task sequence variable created by using this code in a PS script:
<#Put the Custom TS Variable into the Powershell Variable called: $MyVar to be used in the script later...#>
$MyVar = $tsenv.value("MyCustomVariable")
Now we have the basics under our belt, let’s crack on with what we want to achieve…
1. Create a Custom TS Variable that will hold the current time. At the end of the task sequence, we will retrieve this value and put it into a PowerShell variable that will then be used to calculate the total time taken to image, as well as write this info to the registry.
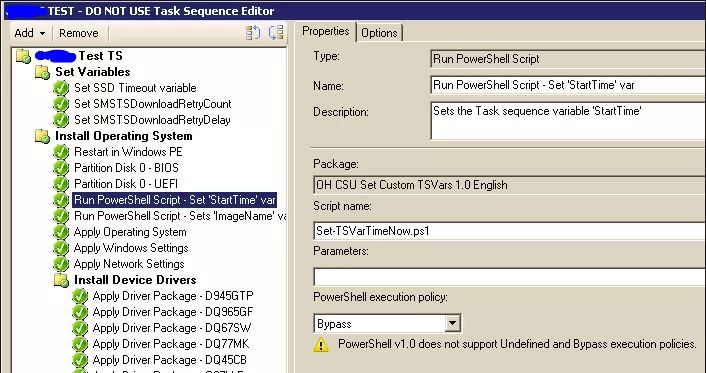
So with that in mind, fire up the ISE (or whatever you use for scripting). Here’s the PowerShell code that I used to create the first custom variable:
$tsenv = New-Object -ComObject Microsoft.SMS.TSEnvironment
$tsenv.value("StartTime") = get-date -format HH:mm:ss
The above code simply gets the current time and stuffs it into a task sequence variable called: StartTime
I saved this as ‘Set-TSVarTimeNow.ps1’ on my SCCM server where I store my normal application deployments.
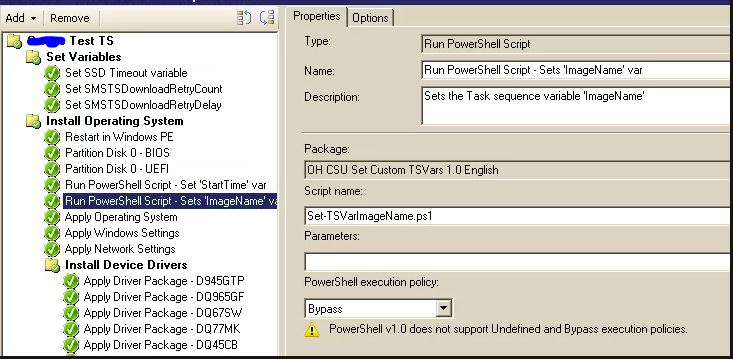
2. My next Task sequence variable isn’t really required as a TS variable as I am ‘hard-coding’ the value, (I do plan on reading this in via PowerShell at a later stage rather than the hard-code method), however I wanted at least two TS vars to play with while I was experimenting! I decided to add a custom TS variable for holding the name of the image being used. My code looks like this:
$tsenv = New-Object -ComObject Microsoft.SMS.TSEnvironment
$tsenv.value("ImageName") = "Win7_x64_180814"
The above code simply stuffs the text “Win7x64180814” into a custom TS var called: ImageName
I saved this as ‘Set-TSVarImageName.ps1’ on my SCCM server where I store my normal application deployments.
NB: It is worth noting that I did not have to break each individual custom var into it’s own script, I could have had them all in one single PowerShell script, however I think for readability within the Task Sequence, this is a bit clearer to other people.
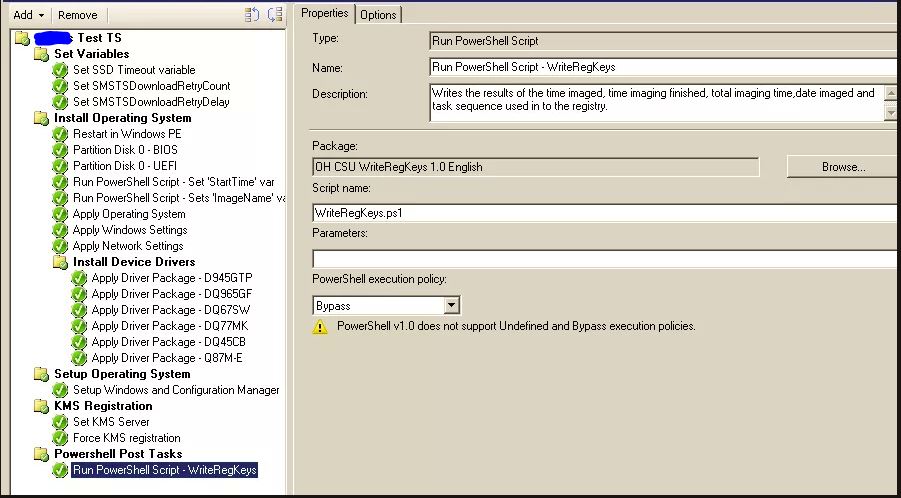
3. I then wrote the final PowerShell script that brings all of the information together and writes the results to the computer registry. I do not intend to teach PowerShell at this point so I’ll leave you with my script to decipher, however you only require very basic PowerShell skills to figure out what’s going on here:
A quick break down, if you open this script up in the ISE:
Lines 1 – 25 Declares a function (Get-TimeDifference) that takes a start and end time and produces an object containing a StartTime, EndTime and TimeDifference. If you do not declare a start or end time then the current time is used.
Lines 27 – 35 Read in the custom TS vars we created earlier into PowerShell variables for processing later in the script.
Line 38 Calls the function Get-TimeDifference and feeds it the start time which was retrieved from our custom task sequence variable ‘StartTime’ (See lines 31 and 32)
Lines 41 – 60 Create the reg Keys and add the values (You may wish to adjust this part to meet your organisational needs)
The script is called ‘WriteRegKeys.ps1’
You can view \ download all three of these scripts from GitHub in my PowerShell repo in the SCCM directory: Set-TSVarTimeNow.ps1, Set-TSVarImageName.ps1, WriteRegKeys.ps1
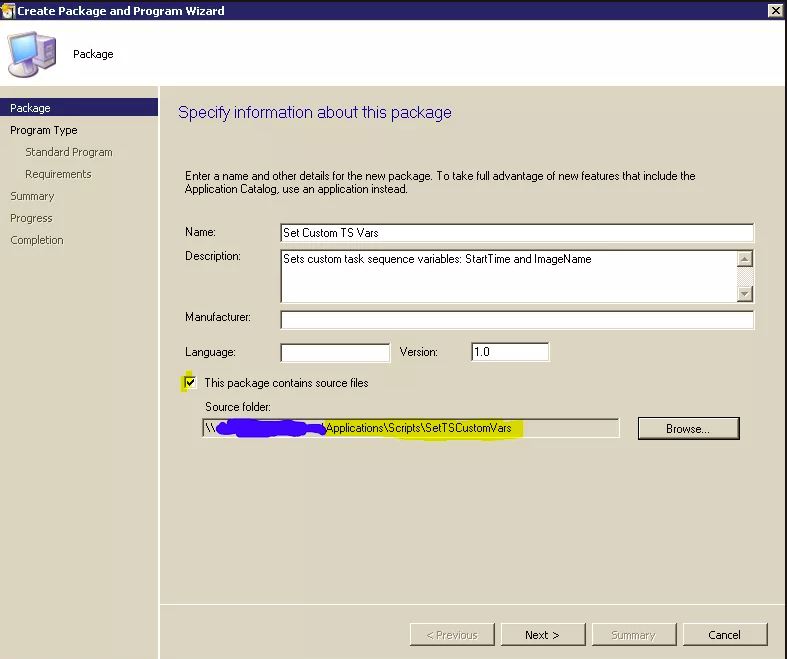
4. The next task is to create packages from the scripts you just created in steps 1, 2 and 3 above using the Configuration Manager console. I saved both Set-TsVarTimeNow and Set-TSVarImageName.ps1 to the same location, and the WriteRegKeys.ps1 to a separate location on my Config manager server. You don’t necessarily need to create an individual package per script.
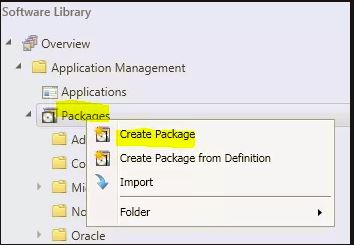
I’m assuming that you know how to create an ‘old-school’ type package with no program required. I’ll walk you through creating the one that contains the two PS scripts together just in case..
a) In the config Manager console, on the Software Library section, Right-Click the Packages node and select New Package:
b) Give the package a meaningful name and browse to the location on your Config Manager server to the directory that contains your two Powershell scripts created in steps 1 and 2 above:
c) Choose ‘Do not create a program’:
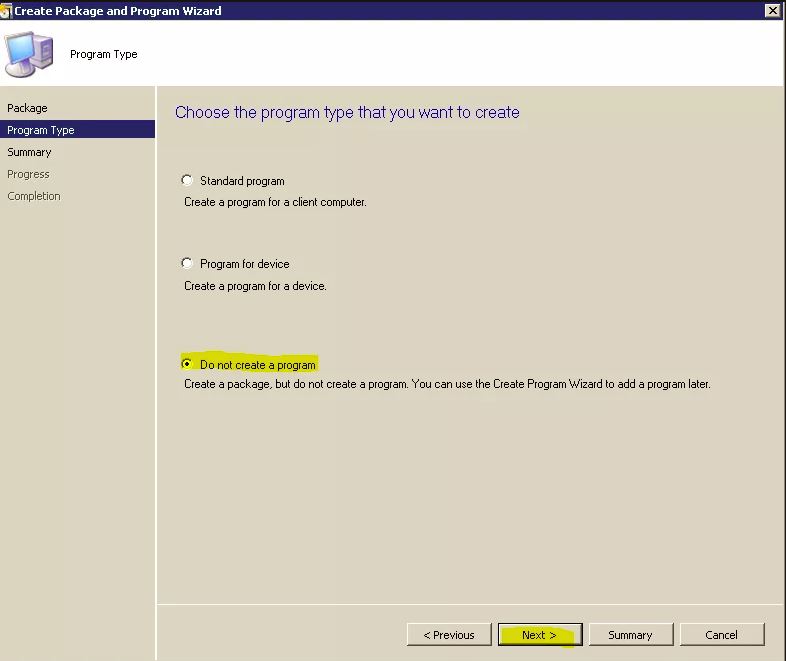
d) Next , Next, Finish…
5.
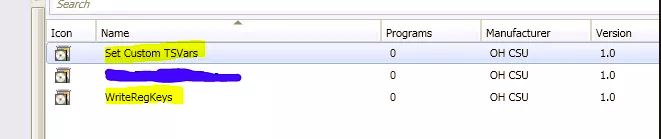
You should now have two programs, I named mine: Set Custom TSVars (This one contains the two scripts that set the custom variables), and the other I named: WriteRegKeys
Don’t forget to upload them to your distribution point.
6. Now in your imaging task sequence, I found that the earliest I could place the setting of the custom variable that will hold the imaging start time is immediately after the disk formatting. As the formatting is the first part of the task sequence, we only loose around 15 seconds while it formats and then it writes the start time to our custom variable. (As a side note I did experiment with writing the custom var to a text file as a prestart command in the boot image and reading in the text file later, however, this could prove more inaccurate as there may be a long pause between the start time and the time the tech actually kicks the image off. I intend to solve this issue when I start writing the custom front end which is what kicked this whole investigation off in the first place!)
With all that rambling out of the way, you need to add 3 ‘Run Powershell Script’ tasks within your task sequence:
Two as close to the start that you can that set the custom variables and one as the last task in your sequence that will calculate the total time and write to the registry:
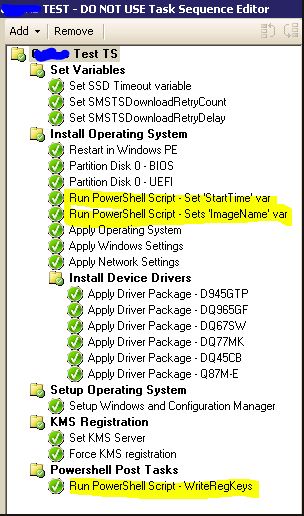
Here is what the properties of the 3 ‘Run Powershell Script’ look like:
8. That’s it. I hope this has been helpful.
As a reminder in case you never saw Part 1 of this article, here’s the finished result from the registry of an imaged computer:

Please feel free to comment below!
Get my books:
ConfigMgr - An Administrator’s Guide to Deploying Applications using PowerShell
“Understanding Microsoft Intune: Deploying Applications Using PowerShell” is available for purchase at all good book stores and online outlets. Don’t miss out on the opportunity to take your application deployment skills to the next level. Get your copy today!
