ConfigMgr: How to Configure BrancheCache
This is part 1 of a two part post. This part demonstrates how to install and configure BranchCache while Part 2 will demonstrate how to determine that BranchCache is actually working.
Let’s start by asking the question:
What is BranchCache?
Here’s a description I took from the Microsoft documentation:
BranchCache is a bandwidth-optimization feature that has been available since the Windows Server 2008 R2 and Windows 7 operating systems. Each client has a cache and acts as an alternate source for content that devices on its own network request. Windows Server Update Services (WSUS) and System Center Configuration Manager can use BranchCache to optimize network bandwidth during update deployment, and it’s easy to configure for either of them. BranchCache has two operating modes: Distributed Cache mode and Hosted Cache mode.
And for further clarification, this is is also from the Microsoft documentation:
Windows BranchCache is integrated in System Center 2012 Configuration Manager. You can configure the BranchCache settings on a deployment type for applications, on the deployment for a package, and for task sequences.
When all the requirements for BranchCache are met, this feature enables clients at remote locations to obtain content from local clients that have a current cache of the content.For example, when the first BranchCache-enabled client computer requests content from a distribution point that is configured as a BranchCache server, the client computer downloads and caches the content. This content is then made available for clients on the same subnet that request this same content, and these clients also cache the content. In this manner, successive clients on the same subnet do not have to download content from the distribution point, and the content is distributed across multiple clients for future transfers.
Now we know what we are talking about, here is my approach on how I implemented this using ConfigMgr at my workplace:
(Be sure to read through all of this guide before implementation, especially the Recommendations section at the end of the document.)
Today I configured one of our smaller branch offices to use BranchCache with ConfigMgr for application deployment.
As usual, I started by reading through official Microsoft documentation to give myself a good grounding:
- http://technet.microsoft.com/en-us/library/gg682077.aspx
- http://technet.microsoft.com/en-us/library/dd637820%28v=ws.10%29.aspx
1.
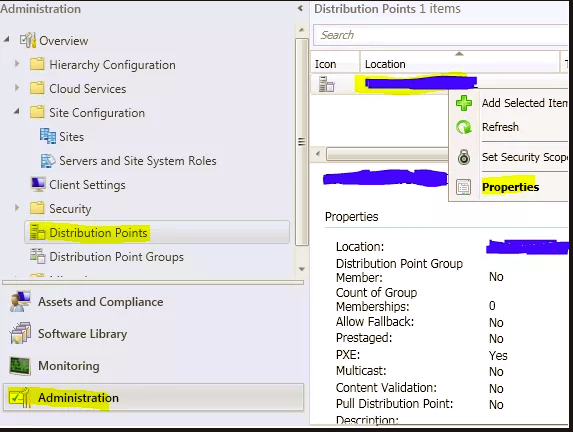
The first thing I did was to enable Branchcache on the distribution point. To do this, right-click the Distribution point and select properties:
2.
Next, select the ‘General tab’ and tick ‘Enable and configure BranchCache for this distribution point:
Ticking this will actually install the BranchCache feature for you! Let’s confirm this by running a simple Powershell command on the Distribution Point:
That’s all that’s required on the server side.
3.
The next thing is to configure BranchCache on the clients. This is as easy as configuring and linking a GPO:
Open GPMC.msc and navigate to: Computer Configuration -> Policies -> Administrative Templates -> Network -> BranchCache
This is where all of the Group Policy settings reside that we need. At a minimum, you will need to:
- Turn on BranchCache
- Set BranchCache Distributed Cache Mode. (You will not require any of the hosted cache settings as Configuration Manager only works with Distributed mode)
I only have Win 7 computers at the moment, however, if you have Windows 8.x you may wish to look at the other settings. (‘Set age for segments in the Data cache’ looks particularly useful.)
4.
The next item is to configure the inbound and outbound firewall rules on the clients. You can either choose to do this in the same GPO or a separate one – whatever floats your boat.
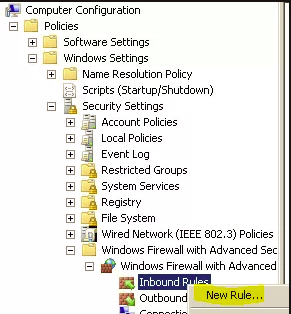
Still within GPMC.msc then, navigate to : Computer Configuration -> Windows Settings -> Security Settings -> Windows Firewall -> Windows Firewall with Advanced Security
Select ‘Inbound Rules’ and right-click it to select ‘New Rule’:
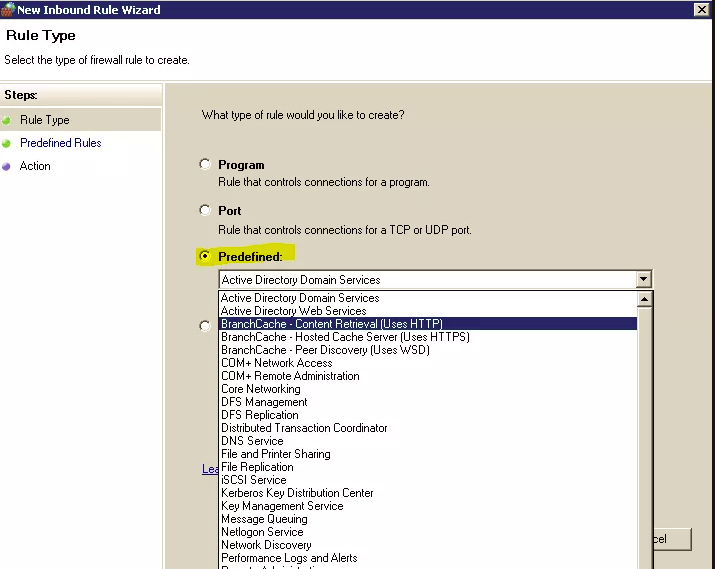
Then select the ‘Predefined’ radio button:
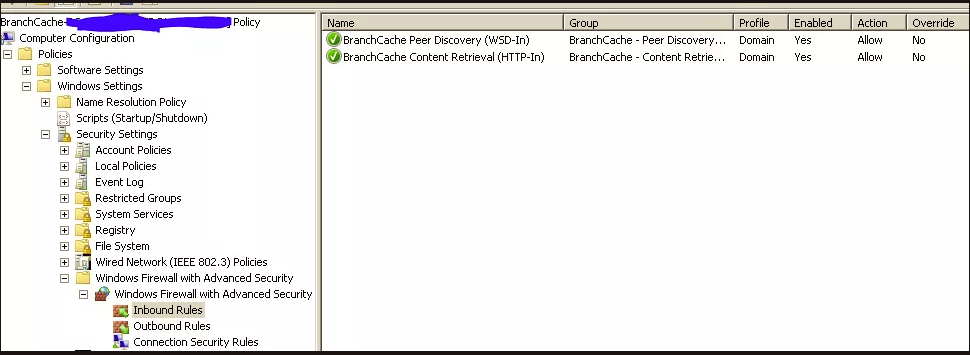
Now add the following two inbound rules as per the screenshot below:
(Note: I went into the properties of these two rules afterwards to ensure that only the domain profile was selected.)
You now need to do the same for Outbound rules:
5.
Make sure you link your GPO’s to the OU that contains the computers that will be used for the BranchCache feature.
6.
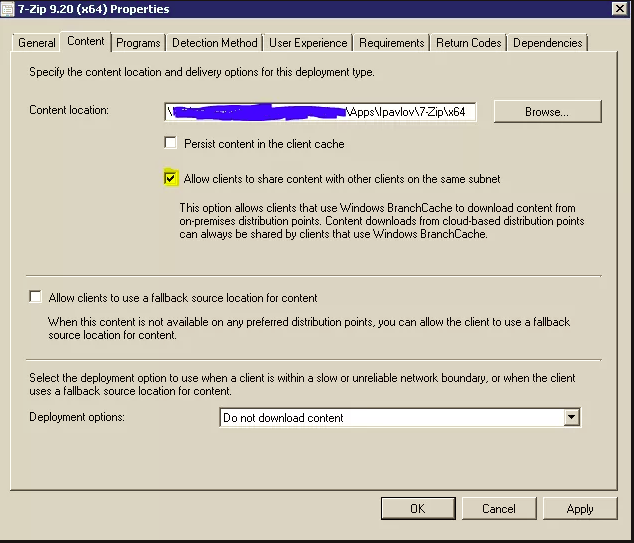
For any application in Configuration Manager that you want to be able to take advantage of BranchCache, simply ensure that you tick ‘Allow clients to share content with other clients on the same subnet‘ which can be found on the properties of the DeploymentType of each application:
That’s it!
Now at your branch office, the first computer that requests an application will pull it down from your BranchCache enabled Distribution Point and then cache it on it’s local hard drive; other computers at the same branch office will contact the DP informing it that it is BranchCache aware and the DP will send it the information back that will allow the client to get the application from it’s peers.
Recommendations:
BranchCache default port
If you don’t change anything, BranchCache uses port 80. This means that if anything else is using this port already, typically a web server for example, then BranchCache wont start. The easiest way to change this is to deploy the task sequence created by 2pintsoftware which configures everything for you. Download it, import it into Config Manager and deploy it to your relevant computer collection. (This also means you do not need step 3 in my guide above as it’s all in this task sequence) If you need help on how to do this let me know in the comments below and I’ll create a ‘how to’ guide.
Note:
There is an error in the 2Pint task sequence that prevents it from executing.
For some reason they have set a condition that the variable to set the cache Time to live (TTL) is only set if the PeerDistSvc service is running - which in most cases it won’t be. Then later in the task sequence this variable is called and fails as the value is blank. So remove it! Hit the ‘Remove all’ button on ‘Set the BranchCache Cache Age Variable’ task and untick the ‘Continue on error.’ Once you’ve done that, all is well. I have notified 2PintSoftware so it may be rectified in a future revision.
Data Deduplication
It is recommended to configure Data Deduplication on your BranchCache enabled distribution points because all of the deduplicated files are already indexed and hashed which makes it quicker. I found this information in the following Microsoft documentation Although I’ve quoted it here for you so you don’t have to bother clicking another link…
You can optimize data access over the network by enabling BranchCache on servers and clients. When a BranchCache-enabled system communicates over a WAN with a remote file server that is running data deduplication, all of the deduplicated files are already indexed and hashed. Therefore, requests for data from a branch office are quickly computed. This is similar to preindexing or prehashing a BranchCache-enabled server.
I used PowerShell to install Data Deduplication on multiple distribution points in one go like this: (Quick PowerShell explanation: the percent sign is just shorthand for foreach-object and $_ represents the current object in the pipeline)
"DP01","DP02","Etc" | %{install-windows-feature -ComputerName $_ -Name FS-Data-Deduplication -IncludeManagementTools}
Note - you will need to restart the Distribution points after you have installed Data Dedupe.
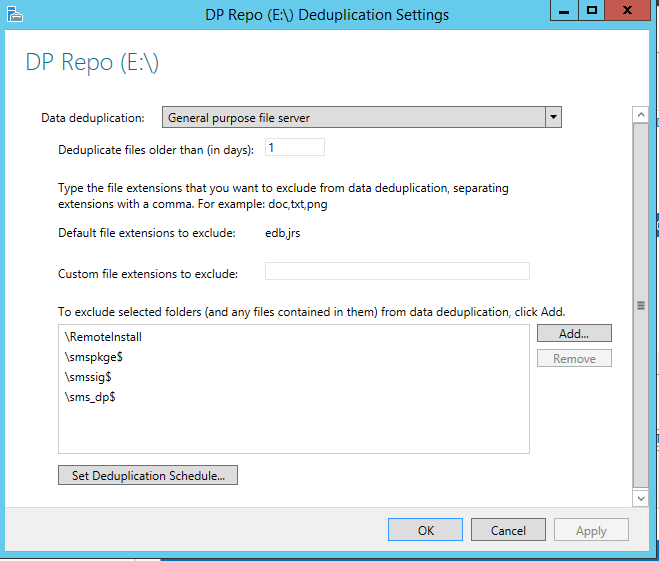
To configure it, set it to Deduplicate files older than 1 day and note the following:
You can only dedupe the SCCMContentLib folder so you must exclude all other folders on the disk. I got this information from here which I was led to from this document, and you would be wise to read it for yourself before proceeding.
Here is what the configuration for Data Deduplication looks like on one of my Distribution Points:
Part 2 of this guide will demonstrate how to determine if BranchCache is actually working.
Get my books:
ConfigMgr - An Administrator’s Guide to Deploying Applications using PowerShell
“Understanding Microsoft Intune: Deploying Applications Using PowerShell” is available for purchase at all good book stores and online outlets. Don’t miss out on the opportunity to take your application deployment skills to the next level. Get your copy today!
